

Ever wondered why you should be using the snapshots and history panels in the develop module of Lightroom? Here’s a video from the Greg at Fro Knows Photo to explain.

In previous posts I’ve introduced the Pixel Bender add-in for Photoshop CS4 and CS5 and the Droste filter created by Tom Beddard. This post I’ll show you how to create the classic frame in a frame image effect using these tools.

The critical part of this effect is getting the image right before you start. You need a framed image so start by opening an image to use. Add some white canvas around the flattened image by first setting the background color to White. Select the Crop tool and drag over the image. Let go the mouse button and then hold the Shift + Alt (Option) key as you drag outwards on a corner handle to add an extra canvas around the image.
Convert the background …
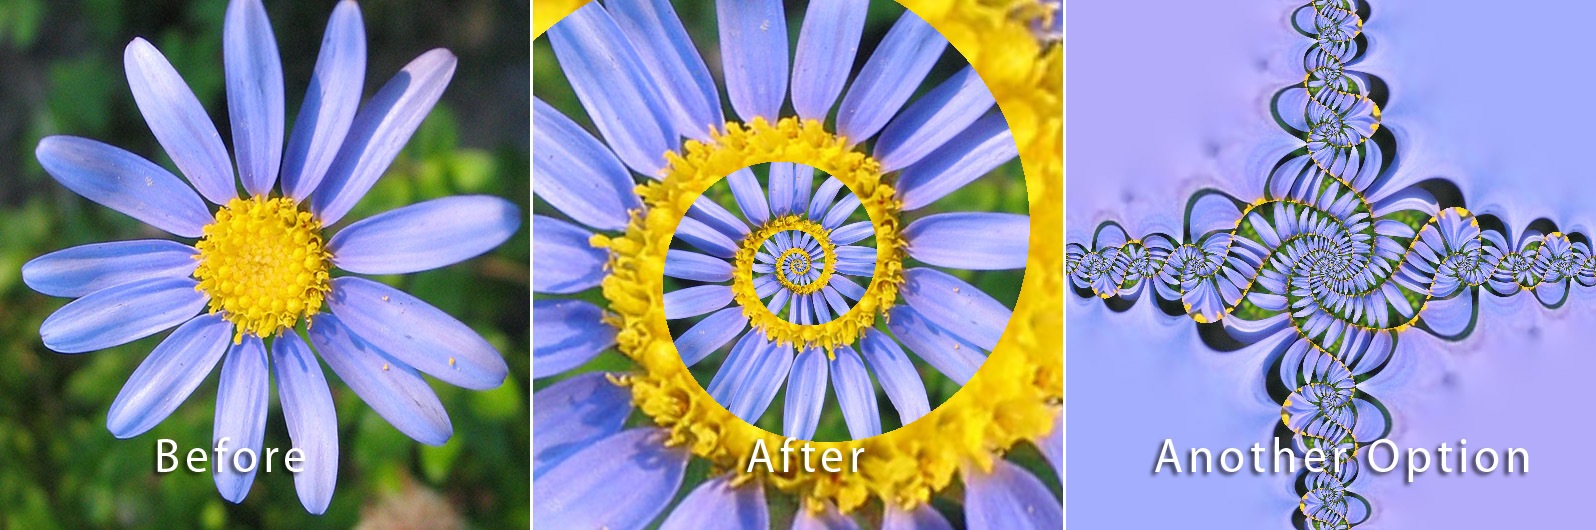
I an earlier blog post I introduced Pixel Bender a new extension for Photoshop CS4 and CS5 from Adobe Labs. In this post I’ll show you a filter which lets you create a Droste effect with an image. The filter is free to download and once it is installed you can apply it from inside Pixel Bender. It was created by Tom Beddard who is author of a lot of really wonderful filters – you can see more of them here.
The Droste effect is an image effect named after a Dutch cocoa company called Droste. In 1904 it produced packaging for its cocoa product showing a woman carrying a tray with a box of cocoa and a cup on it. A small version of the package appeared on the cocoa box on … One of the cool new tools from Adobe Labs is Pixel Bender. This free extension lets you apply any one of a series of filters that comes with the extension to your images in Photoshop CS5. But that’s not all – Adobe also provides a simple interface for Pixel Bender that lets you create your own filters. As a result a community is building around Pixel Bender with users sharing custom created filters with others. In this post I’ll show you how to get started with Pixel Bender.
You will find the Pixel Bender extension here for download: http://labs.adobe.com/downloads/pixelbenderplugin.html. Make sure to download the version that matches your operating system and your version of Photoshop CS5 (32 or 64 bit). The extension is an .mxp file and you …

I was recently asked how to convert the background of an image from black image to white. It isn’t a trivial task so it got me thinking. One of the problems is that things shot against a black background actually pick up black or dark reflections so it’s not enough to merely remove the black – you also have to solve some of the reflection problems as well.
This method won’t work on every image but provided the subject is well lit so there are minimal dark reflections to deal with, it is quick and effective.

Step 1
Start by making three copies of the background layer of the image by right clicking it and choose Duplicate Layer three times.
Set the top layer’s blend mode to Color and the second …
I was recently asked how to convert the background of an image from black image to white. It isn’t a trivial task so it got me thinking. One of the problems is that things shot against a black background actually pick up black or dark reflections so it’s not enough to merely remove the black – you also have to solve some of the reflection problems as well.
This method won’t work on every image but provided the subject is well lit so there are minimal dark reflections to deal with, it is quick and effective.
Step 1
Start by making three copies of the background layer of the image by right clicking it and choose Duplicate Layer three times.
Set the top layer’s blend mode to Color and the second top layer’s blend mode to Lighten.

Step 2
Target the third top layer and choose Image > Apply Image. Set the Channel to Red as it is typically lightest in the areas where the data is that you want to retain. Select Invert and make sure the Blend mode is set to Normal. You will see the image now with the background removed. Click Ok.

Step 3
Now all you have to do is to tidy up the problems. Typically this is problems with color or the edges. For this I make yet another duplicate of the background layer and drag this to the top of the layer stack. Make a rough selection of the background using a tool like the Quick Selection tool and then hold Alt (Option on the Mac) as you click the Add Layer Mask icon at the foot of the layer palette. You can now use this layer to add color or to fix other problems.
In this image I reduced the opacity of this layer to around 30% to bring back some missing detail in the flower.
I also added a new layer, set its Blend Mode to Color, sampled some color from the flower and painted over some of the petals where they showed pink once the black was removed.
The image is © Lars Sundstrom from sxc.hu


